Online query thread calculation | metric, American and imperial thread marking knowledge points
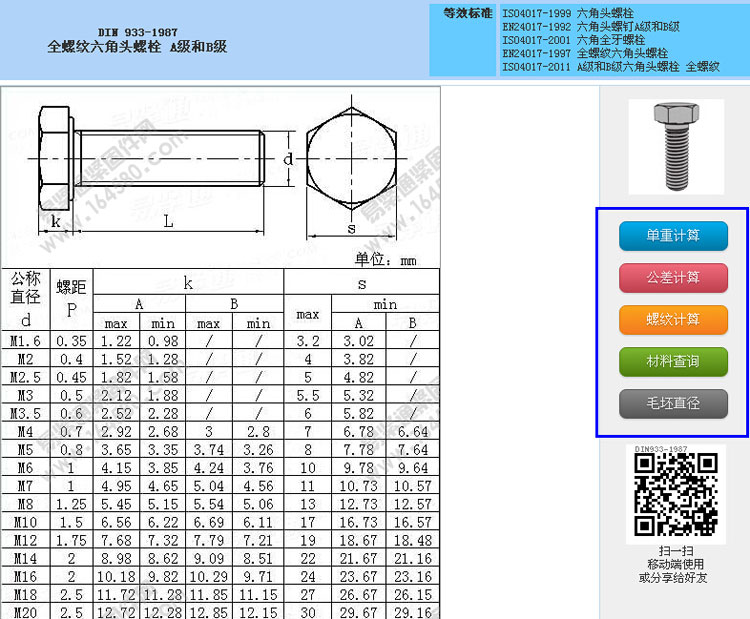
Great news! Easy-to-tight fastener mesh introduction: thread calculation, tolerance calculation, blank diameter calculation, single weight calculation, material inquiry function, the result can be obtained by moving the mouse. Good to use, try to know!

Used friends have feelings, the introduction of online inquiry function, really provides too much convenience! I really want to give 32 functional designers and function implementers! ! ! Great convenience for fasteners (standard parts, screws) sales staff, procurement staff to carry out business efficiently!
Friends who have passed this article, welcome you to interact with us and make better comments and suggestions!
Let us all work together to introduce more useful features! 0571-28068193, QQ
The following is a description of the metric markings for metric, American and Imperial threads:
1, metric thread mark:
1.1 marking method
The complete thread mark consists of the thread feature code, size code, tolerance code and other codes. The thread feature code is indicated by "M".
The size of the single-thread thread is “nominal diameter ╳ pitchâ€, and the nominal diameter and pitch value are in millimeters. For coarse thread, the pitch term can be omitted.
The size code of the multi-thread thread is "nominal diameter ╳ Ph lead, P pitch", nominal diameter, lead. and pitch value in millimeters. You can add parentheses to indicate the number of lines (English).
The tolerance band code includes the middle diameter and the top diameter tolerance band code, the middle diameter tolerance band code is in front, and the top diameter tolerance band code is in the back.
The internal thread is in uppercase letters and the external thread is in lowercase letters. If the medium diameter tolerance band code and the top diameter tolerance band code are the same, only one tolerance band code is marked. The thread size code is separated from the tolerance band by the "â”" mark. Massively produced fastener threads (medium tolerance and medium screw length, 6H/6g) are not marked with tolerance bands.
When the thread is matched, the internal thread tolerance is coded first, the external thread tolerance is coded after the middle, and the middle is separated by a slash.
For threads with short and long lengths, the "S" and "L" codes should be marked after the tolerance band code. The screw length code and the tolerance band are separated by "â”". The medium rotation length group is not labeled. The rotation length code (N).
The left-hand thread should be marked with the "LH" code after the screw length code. The rotation length code and the rotation code are separated by a "â”". Right-handed threads are not marked with a rotation code.
1.2 Tag example
1.2.1 Ordinary thread feature code and size code part marked with a nominal diameter of 8mm, a pitch of 1mm single thread fine thread: M8 × 1
Single thread coarse thread with a nominal diameter of 8 mm and a pitch of 1.25 mm: M8
Double thread with nominal diameter of 16mm, pitch of 1.5mm and lead of 3mm:
M16×Ph3P1.5 or M16×Ph3P1.5(two starts)
1.2.2 Increase the tolerance with the code number after the labeling diameter is 5g, the top diameter tolerance band is 6g external thread: M10×1-5g6g
Medium diameter tolerance belt and top diameter tolerance belt with 6g coarse external thread: M10-6g
Internal thread with a tolerance of 5H and a top diameter of 6H: M10×10-5H6H
Middle diameter tolerance band and top diameter tolerance band 6H coarse internal thread: M10-6H
Both the medium diameter tolerance zone and the top diameter tolerance zone are 6g, medium tolerance diameter precision coarse external thread: M10
Medium-diameter tolerance belt and top-diameter tolerance belt are 6g, medium-diameter diameter precision coarse internal thread: M10
The internal thread with tolerance band of 6H is matched with the tolerance band of 5g6g external thread: M20×2-6H/5g6g
Internal thread with tolerance band of 6H and external thread with tolerance band of 6g (medium precision, coarse teeth): M20
1.2.3 Add the internal thread of the short twist length after adding the screw length code: M20×2-5H-S
Internal and external thread with long twist length: M6-7H/7g6g-L
Externally threaded external thread (coarse, medium precision 6g tolerance band): M6
1.2.4 Add the label after the rotation code (complete label)
Left-hand thread: M8×1-LH (tolerance band code and screw length code are omitted)
M6×0.75-5h6h-S-LH
M14×Ph6P2-L-LH or M14×Ph6P2(three starts)-L-LH
Right-hand thread: M6 (pitch, tolerance band code and direction code are omitted)
Thread marking (metric, US and Imperial)
2, the United States unified thread mark
2.1 The basic mark of the US unified thread
The uniform thread for the standard series, standard screw length and standard tolerances contains five basic elements. They are nominal diameter, number of teeth, thread series code, tolerance band code and inspection system code (see ASMEB 1.3M).
2.2 Marking of threaded threads
The top and middle diameter dimensions of the pre-plated and post-plated threads are supplemented on the basis of the basic markings.
2.2.1 When the tolerance of the 2A thread is used to accommodate the coating, the maximum value after plating is the basic size of the thread; the limit size before plating is the standard limit size of the 2A thread.
Example:
3/4-10UNC-2A(21) AFTER
Majordiam...0.7500max AFTER After plating: Maximum diameter PD0.6850 max COATING Maximum diameter Majordiam.0.7482-0.7353 BEFORE Plated: Large diameter limit size PD0.6832-0.6773 COATING Medium diameter limit size If 2A threaded tolerance Can not be occupied by the coating layer, then the letter "G" should be added after the 2A thread tolerance band code, that is, the tolerance band code of this thread is "2AG". Its plated maximum is the maximum of the 2A thread standard limit size; its pre-plated limit size is the special limit size (SPL) of the 2A thread.
Example:
3/4-10UNC-2AG(22)
Majordiam...0.7482max AFTER After plating: Maximum large diameter PD0.6832 max COATING Maximum diameter Majordiam.0.7464-0.7335 BEFORE Pre-plating: Large diameter limit size (Special PD0.6814-0.6755 COATING Medium diameter limit size (special)
3. Inch Wyeth thread (BSW, BSF, Whit.S and Whit.)
Wyeth thread basic marking nominal diameter, number of teeth, thread series code, direction code, tolerance band code and internal or external thread English words.
The coarse tooth series, fine tooth series, selection combination series and selected pitch series thread codes are “BSWâ€, “BSFâ€, “Whit.S.†and “Wi†respectively.
The code for the left-hand thread is "LH". The code of the right-handed thread is omitted and not marked.
The free, medium, and tight tolerance codes for external threads are “fyeeâ€, “mediumâ€, and “closeâ€; the normal and medium-level tolerance codes for internal threads are “normal†and “mediumâ€, respectively.
The English words for internal and external threads are "nut" and "bolt" respectively.
Example:
1/4in.-20B.SW, LH(close)bolt.
11/2 in.-8B.S..FSF, (normat)nut.
1 in.-20B.Whit(free)bolt.
0.67in.-20. Whit.(medium)nut
The thread code of the multi-thread thread is "Whit". The number of lines (start), lead, and pitch are required to be marked inside the mark.
Example:
2in.2start, .0.2in.lead, 0.1in.pitch,Whit.
  Ordinary metric, imperial, and American thread calculation formulas
Metric thread (MM tooth)
Tooth depth = 0.6495 * pitch P
(fang angle 60 degrees)
Internal tooth diameter = nominal diameter -1.0825*P
M20x2.5-6H/7g (right hand) - (single head thread) - (metric thick teeth)
(nominal diameter 20mm) (tooth pitch 2.5mm)
(internal thread matching level 6H)
(External thread matching level 7g)
Left-double head-M20x1.5 (left hand)-(double thread)-(metric fine teeth)
(nominal diameter 20mm) (tooth pitch 1.5mm)
American thread
(unified standard thread)
Tooth depth = 0.6495* (25.4/number of teeth per tooth)
(fang angle 60 degrees)
3/4-10UNC-2A
(UNC coarse teeth) (UNF fine teeth)
(1A 2A 3A external tolerance tolerance level)
(1B 2B 3B internal tolerance tolerance level)
UNC American standard standard coarse thread outer diameter 3/4 inch, each level 10 teeth outer teeth 2 level tolerance
Steel box girder and steel and concrete composite box girder are used for large spans, which need to minimize the weight of the bridge, and their excellent high torsional stiffness is particularly useful. The clean lines of the box girder bridge usually have no obvious external hardening. It is generally considered to have excellent appearance and durability, and it has no traps for dust and moisture. Box-shaped cross-sections are sometimes used as compression members, such as in cable support structures or arched towers.
Box Girder Formwork,Box Girder Structure,Metro Box Girder Formwork,Bridge Box Girder Formwork
Anshan Lijian Engineering Group Co. LTD , https://www.lijianformwork.com