Steps to install the radiator Radiator installation location selection
As the weather gets colder, everyone starts to heat up. Especially in the north, the temperature is almost zero. Therefore, heating is a very necessary thing. Then you choose to warm it? Radiator installation is the most important part of the consumer before using the radiator, because the quality of the radiator installation quality not only affects the normal use of the radiator, but also directly lead to many problems such as radiator leakage, radiator is not hot and so on. The reasons, of course, what convenient to choose what, relatively speaking, the more traditional heating is still used by many people, then the installation of the radiator is a lot of owners concerned about the problem, and today Xiaobian to teach everyone to install the radiator installation steps And the installation location of the radiator is for reference.

Radiator installation procedure
One: Slot the floor or wall. In order to bury the exposed pipelines, the construction team must slot the walls and the ground. The depth or width of the trenches requires special installation personnel to collect the actual treatment.
Two: Laying pipelines and retaining slots. According to the position of the previous heat sink, the slot is laid and the branch pipe is laid. According to the customer's requirements, the pipe can be laid in the branch pipe to protect the pipe, and the system closes the water and suppresses the pressure.
Three: Install a water separator. The water separator is a water flow distribution and collection device composed of a water separator and a water collector. The water separator installation should be kept level and wiped clean after installation.
Four: Pressure test on the radiator system. This is a very important step in the radiator installation procedure. The specific operation is: close the main valve and open the radiator inlet valve to test with pressure test equipment. The experimental pressure should be 1.5 times the normal operating pressure, and not less than the entire area The experimental pressure of the pipe network is 3-5 minutes without leakage.
V: According to the progress of the renovation. Heat sink construction and hydropower construction are carried out simultaneously so as not to affect the construction progress.
Six: Install radiators. Place the radiators in a stable position, connect the valve connector to the inlet and outlet valves, use a level gauge to measure the radiator straight, and install the piping to meet the requirements. Then use a pipe wrench to tighten the connectors.
Seven: Install a hanging fireplace. The horizontal distance between wall-hung boilers, gas meters and gas stoves should be greater than 300mm. There should be no electric power lines and electrical equipment above the boilers. The net distance between wall-hung boilers and electrical equipment should be greater than 300mm. No explosive items should be placed near the boilers. Other volatile dangerous goods. When installing, tilt the flue down 2° or 3° to prevent condensate from entering the interior of the boiler.
Eight: The customer checks and accepts the entire system of the radiator. Usually during the replacement construction, workers will set aside valves on the pipeline. After the installation, a stamping test shall be conducted to prove that no run, place of emergence, dripping, or leakage can be accepted.
Nine: The installation of the radiator system is completed. The entire radiator installation steps are completed, and the user can smoothly enter the use phase.
Radiator installation location selection
Should not be high
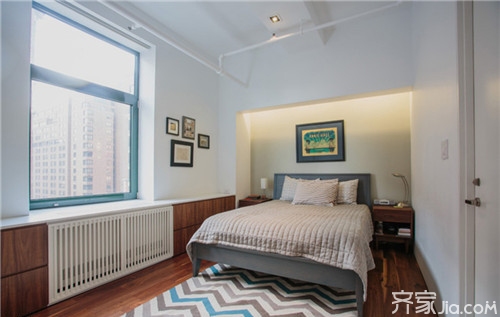
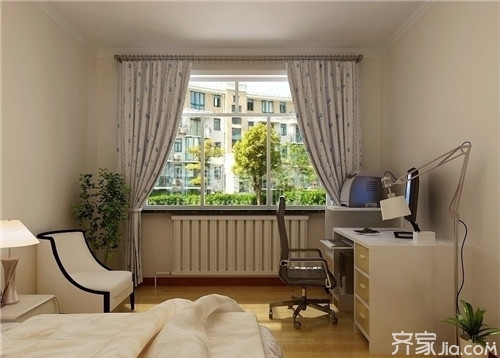
According to the principle of air, the hot air rises and the air-cooled sinks. The higher the radiator heat loss, the greater the heat loss. Since the heat is emitted from the radiator, when selecting the location, consider both the convection problem and the heating of the cold air. The problem. Under normal circumstances, radiators should be installed under the window sill, because the radiator is close to the ground, can not only make the indoor air convection, maintain a room temperature balance, but also can make the air drilled from the window seam to heat, play cold The role.
Windows first
The placement of the radiator under the window does not affect the placement of the furniture, and it is able to effectively block the discomfort caused by cold air entering. If the radiator is installed on the wall, it will cause the dirty surface of the wall to affect the appearance.
Radiator installation location selection considerations
1, when the heating starts to give the radiator deflated, so as to ensure the heat dissipation.
2. The radiator should be installed under the window so as to prevent the unpleasant feeling caused by the cold wind of the window and contaminate the wall surface.
3, the full year of water maintenance, any material radiator water maintenance is an effective means of anti-corrosion.
4, can not add a radiator package, one radiator filth, and second, affect the cooling effect.
5, to avoid use in a humid environment. Radiators use boilers to produce steam or hot water, and they are transported through pipes to radiators (commonly known as radiators) in buildings to radiate heat or convection to increase the room temperature.
Summary: The installation procedures for the installation of the radiators and the selection of the radiator installation location were introduced here. I hope this article will be helpful to everyone. If you still have something you don't understand, you can leave a message to Xiaobian at the bottom. We will answer your questions as soon as possible.
Heating
Dome lenses are hemispheres. The two optical surfaces are an equal thickness apart, creating a naturally strong shape that gets tougher under pressure. This makes dome windows ideal for underwater environments and in applications such as camera dome ports and submersible windows.
BK7 or K9L domes are used primarily in meteorology applications. BK7 offers excellent transmission from 300nm up to 2µm. BK7 is a relatively hard material, with excellent chemical durability.
UV fused silica domes ( JGS1 ): For applications operating in the deeper UV range, we offers a range of UV fused silica domes. Fused silica domes are commonly used in underwater applications at extremely high pressures.
Sapphire domes: For infrared applications we can provide sapphire domes. Sapphire is an extremely hard material with transmission of over 80% in the 2-5µm wavelength range. As with fused silica, sapphire is able to withstand extreme pressures, making it the perfect material for underwater camera and missile fairing applications.

Specifiation of our dome lens as follow:
Material:Optical glass N-BK7 , H-K9L, UV Fused Silica, Sapphire, and infrared crystal materials.
Diameter:20-350mm
Diameter Tolerance:+/-0.1mm
Thickness:>2mm
Thickness Tolerance±0.2~0.1mm
Center Deviation:3-5'
Surface quality:80/50 60/40
Coating: Antireflection Coating inside or both sides
Chamfers:0.2 x 45° typical
Hk9 Glass Dome Lens,Hk9 Hemisphere Domes Lens,Hemispheric Glass Dome Lens,Optical K9 Glass Dome Lens
China Star Optics Technology Co.,Ltd. , https://www.csoptlens.com